Announcement
Collapse
No announcement yet.
Simple Russian PI detector Pirat
Collapse
X
-
Just Measure the input pins to Grd both inverted and Non. Both Op Amps. Measure the outputs as well. All Referenced to Grd Neg.
-
I made this already. I have posted the voltages here , but i think i have measured it wrong. I need to measure inverted inputs + and - . I have only measured every pin with - at negative rail (GND). What should come out?
I need a simple testing circuit for the k157ud2.
Leave a comment:
-
Ok, so do you think that my K157ud2 is damaged?
I have ordered 2 used ones from lithuania again.
Leave a comment:
-
No Arrows to any Caps. LOL I only drew lines to the FET and Coil connections.
""I get positive between the coil in and coil out (yellow connections) 150mV, that means i have two positive coil connections. Maybe a damaged damping resistor? Or maybe everything here is ok?
And its the right section of the circuit. I think the coil was not connected."" If you measured without the coil Then 150mV has to be the Voltage drop of the R9. Make all your measurements with Neg Lead to Neg side of battery as Reference. Your seeing the coil connections Positive because your referencing to the Neg of Battery. One side of the Coil is MORE Negative then the Other.
Leave a comment:
-
I get positive between the coil in and coil out (yellow connections) 150mV, that means i have two positive coil connections. Maybe a damaged damping resistor? Or maybe everything here is ok?
And its the right section of the circuit. I think the coil was not connected.
But this doesnt matter, i had a sound signal before without coil.
I have battery voltage between the red ones , because this is nothing else than the battery.
I think my mosfet works , because i have tested it on function with a multimeter and i have a oscillating signal at coil in/ground.
I made all measurements without coil.
Why is there an arrow at the polyester capacitor?
Leave a comment:
-
Originally posted by BKY1337 View PostI cant get the battery voltage at the coil connectors, because its + at the one side and + at the other. No ! Coil out is connected to Pos. Coil in is sourced by Neg from Fet.
When i connect the multimeter to ground and to the middle bar , where the mosfet drains into and also the damping resistor is then i have about the battery voltage
maybe a little less , 7,6 V or something like that. I have also a positive voltage when i connect ground and the other coil connector to the multimeter, because its the upper and the lower rail, + and -.
I dont really know how it works, do i need to have a + and a - at the coil wires?
Yes, Coil in is Neg and Coil Out Pos.
The NE555 is the oscillator,which brings the irf740 to drain the battery voltage into the coil. I still need to learn how the right part of the circuit works.
I think its just for the audio and for the processing. Yes Audio is produced by the coil switching.
But i have only about 150mV at the coil , and between the positive rail and where the mosfet drains into. That is the Voltage Drop caused by the coil.
When i connect my conductivity meter , which has a speaker in it between the positive rail and the base of the transistor at the right side , then the speaker makes a loud sound , louder than the speaker in my conductivity meter, so i think something got amplified. Yes, BC547B is the Audio Out Put. You injected signal on input.
See within the Quote.
Leave a comment:
-
I cant get the battery voltage at the coil connectors, because its + at the one side and + at the other.
When i connect the multimeter to ground and to the middle bar , where the mosfet drains into and also the damping resistor is then i have about the battery voltage
maybe a little less , 7,6 V or something like that. I have also a positive voltage when i connect ground and the other coil connector to the multimeter, because its the upper and the lower rail, + and -.
I dont really know how it works, do i need to have a + and a - at the coil wires?
The NE555 is the oscillator,which brings the irf740 to drain the battery voltage into the coil. I still need to learn how the right part of the circuit works.
I think its just for the audio and for the processing.
But i have only about 150mV at the coil , and between the positive rail and where the mosfet drains into.
When i connect my conductivity meter , which has a speaker in it between the positive rail and the base of the transistor at the right side , then the speaker makes a loud sound , louder than the speaker in my conductivity meter, so i think something got amplified.
Leave a comment:
-
The NE555 Tool says that the Output frequency should be about 140Hz . But it's 0,2 kHz --> 200kHz. Maybe its because of my multimeter or because of different sized resistors.
I think the Coil should be under voltage , even when the k157ud2 is damaged, or not? How much voltage is normal for the coil?
Leave a comment:
-
-
My NE555 was damaged, i replaced it with a new NE555P and now i have a sound output at pin 3 with Speaker/Resistor,
but the detector doesnt work. I dont want to order a new K157ud2 , i have a TL082 , i think its possible to connect the 8 pins from it to the 14 pin socket.
Leave a comment:
-
This is super but the question now is what can we add (between rx and tx or after rx)
to get some simple discrimination.
And of course the depth together with voltage should be improved.
Leave a comment:
-
Missed it.Originally posted by homefire View PostThink I'll give it a shot some day. No Actual Values given. Sad !
Simple metal detector on the principle of induction balance
I present you the scheme and design of a simple metal detector for making your own hands

Fig.1. Schematic diagram of a metal detector
The circuit is based on two NE555 chips. Here there is a transmitting (Tx) and receiver (Rx) coils, so the circuit can be conditionally divided into two parts. The left part is a rectangular pulse generator. The time-consuming components R1, R2, C1 are matched so that the output frequency is about 700 Hz. This is the frequency of the audible range. The pulses are transmitted through a current-limiting resistor R3.
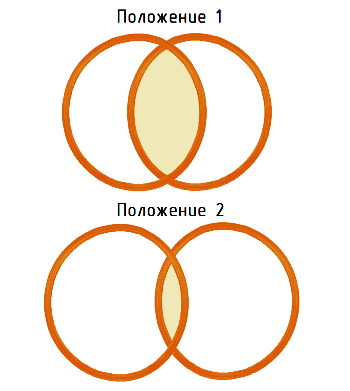
Both coils are located in space in such a way that they together form a certain overlap zone and the system is in the induction balance. In this case, in the receiving coil, the zero voltage and the right-hand side of the circuit do not react at all. If a metal object appears nearby, an imbalance occurs and an audible signal appears.
The signal from the receiving coil is amplified by the transistor VT1 and goes to the input of the second IC. As the bipolar transistor VT1 KT3102EM is used, it can be replaced by any analogous one with a large gain factor. With the help of four resistors R5 - R8, a voltage divider is formed. Variable resistors serve to adjust the metal detector. R6 is a trimmer and is adjusted after the mutual placement of the coils. And R7 and R8 are for rough and fine tuning, they should be installed on the body of the device (ensure easy access to them).
The acoustic signal is created by the piezo radiator BA1, which can be taken from an unnecessary multimeter. But when testing the circuit, I liked the sound of a piezo-emitter with a built-in oscillator. Despite the fact that the pulse signal is formed at the output of DD2, it will not only signal well, but it will also allow to detect the slightest changes in sound when a metal object is detected.
Creating coils
To wind the coils of a metal detector, an enameled winding wire with a diameter of 0.3 mm is required. In my case, the maximum permissible diameter is 0.7 mm.
The optimum diameter of the winding of the coil is approximately 15-16 cm. You should pick up a round object (for example a bucket) to wind the coil around it. But you can use the device. To do this on a clean wooden surface you need to hammer nails in a previously drawn circle.

The inner diameter in my case is 15.5 cm. I wound 25 full turns. The number of turns can and even needs to be done more than me, for example, about 50 turns. The winding wire itself can be taken from unnecessary electric motors or power transformers.
When the coil is wound, carefully remove it from the device and wrap it with paper tape. In the end, you need to make two absolutely identical coils. Then use a knife to scrape off the varnish and after cleaning these ends need to be tinned.
Windings have the ability to bend and lose the correct geometry, so the coils need to be completely wrapped, for example with paper tape. After that, they need to be slightly flattened where they overlap each other. Often they are made similar to the letter "D" as shown in the figure below.

As a basis for search coils, it is convenient to use a sandwich panel, which is used for slopes of plastic windows.
The board will be some distance from the search coils and it is not recommended to use conventional wires. To connect the coils to the board, I used a shielded wire, if I'm not mistaken from the microphone.

Shielded wire for connecting the coils to the board.
The center wire should be soldered to the beginning of the coil, and the other to the negative supply as shown above.
For both coils, of course, the wires will be separate so that there is no interference.
Arrangement and tuning of coils
The system setup begins before the coils are glued to the base.
The trimmer resistor R6 is set to approximately 90 kΩ, and the adjusting resistors R7 and R8 are set to the middle position. Now you need to move the coils. The instrument will sound in two positions. With a wide and narrow overlap. I suggest locking the coils with their narrow overlap as shown in the figure below (position 2). According to my observations in position 2, sensitivity is better and more accurate positioning takes place.

After that, you need to glue it to the base properly. I did this with a hot glue. But if there is a desire, you can make deepenings for the coils at the bottom and fill them with epoxy.
Once the glue has solidified, you need to adjust the settings again. R7 and R8 we do not touch yet, they are installed in the middle position and the resistor R6 needs to achieve a position in which the sound emitter slightly crackles and so to say is in the boundary position between silence and squeaking (on the verge of failure). In the future, when using a metal detector, you only need to adjust the position of R7 and R8. This is due to the fact that the device is not ideal, the coils are not shielded, and the settings will deteriorate when the battery voltage is lost.
Option revision
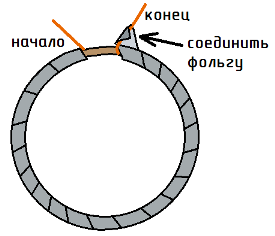
If desired, you can make additional rework of the coils - shielding from external electromagnetic fields ("Faraday shield"). This is done after the initial coating of the windings, which was described earlier (paper tape or tape). Then you need to take long strips of aluminum foil and wrap the coils. This is not done completely, but a gap of about 1-2 cm is left at the place where the wires are output. The foil is connected to the end of the coil and connected to the minus supply. After that, the coil is covered with electrical tape.

I did not do this, because I was afraid of losing sensitivity.
Metal detector construction
After soldering the components, it is desirable to remove the residues of flux and rosin from the surface of the board. They can badly affect the operation of the circuit.
I decided to place the board in a metal box, and that there was no closure with soldered connections, the bottom of the case was covered with electrical tape. Later, I most likely pick up the plastic case.

Always pay attention to the stiffness of fixing the cables. It will be insulting if in the process of using anything discards.
The circuit will be powered by a battery of the "crown" type. The circuit has a low power consumption, but still it is better to put an alkaline battery, it will ensure the device works on several "cops".
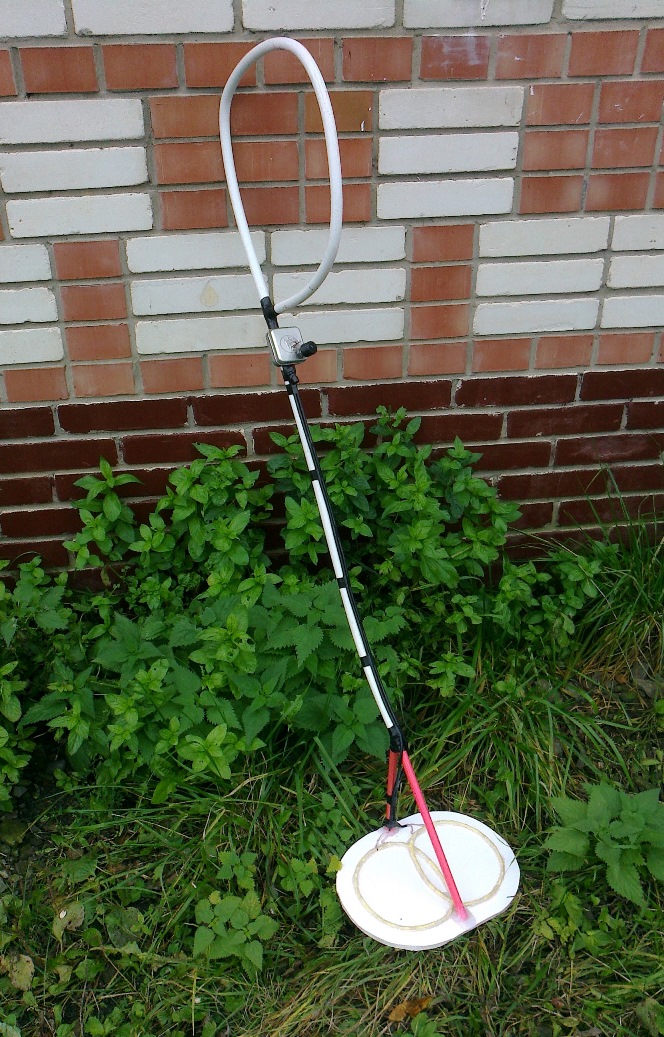
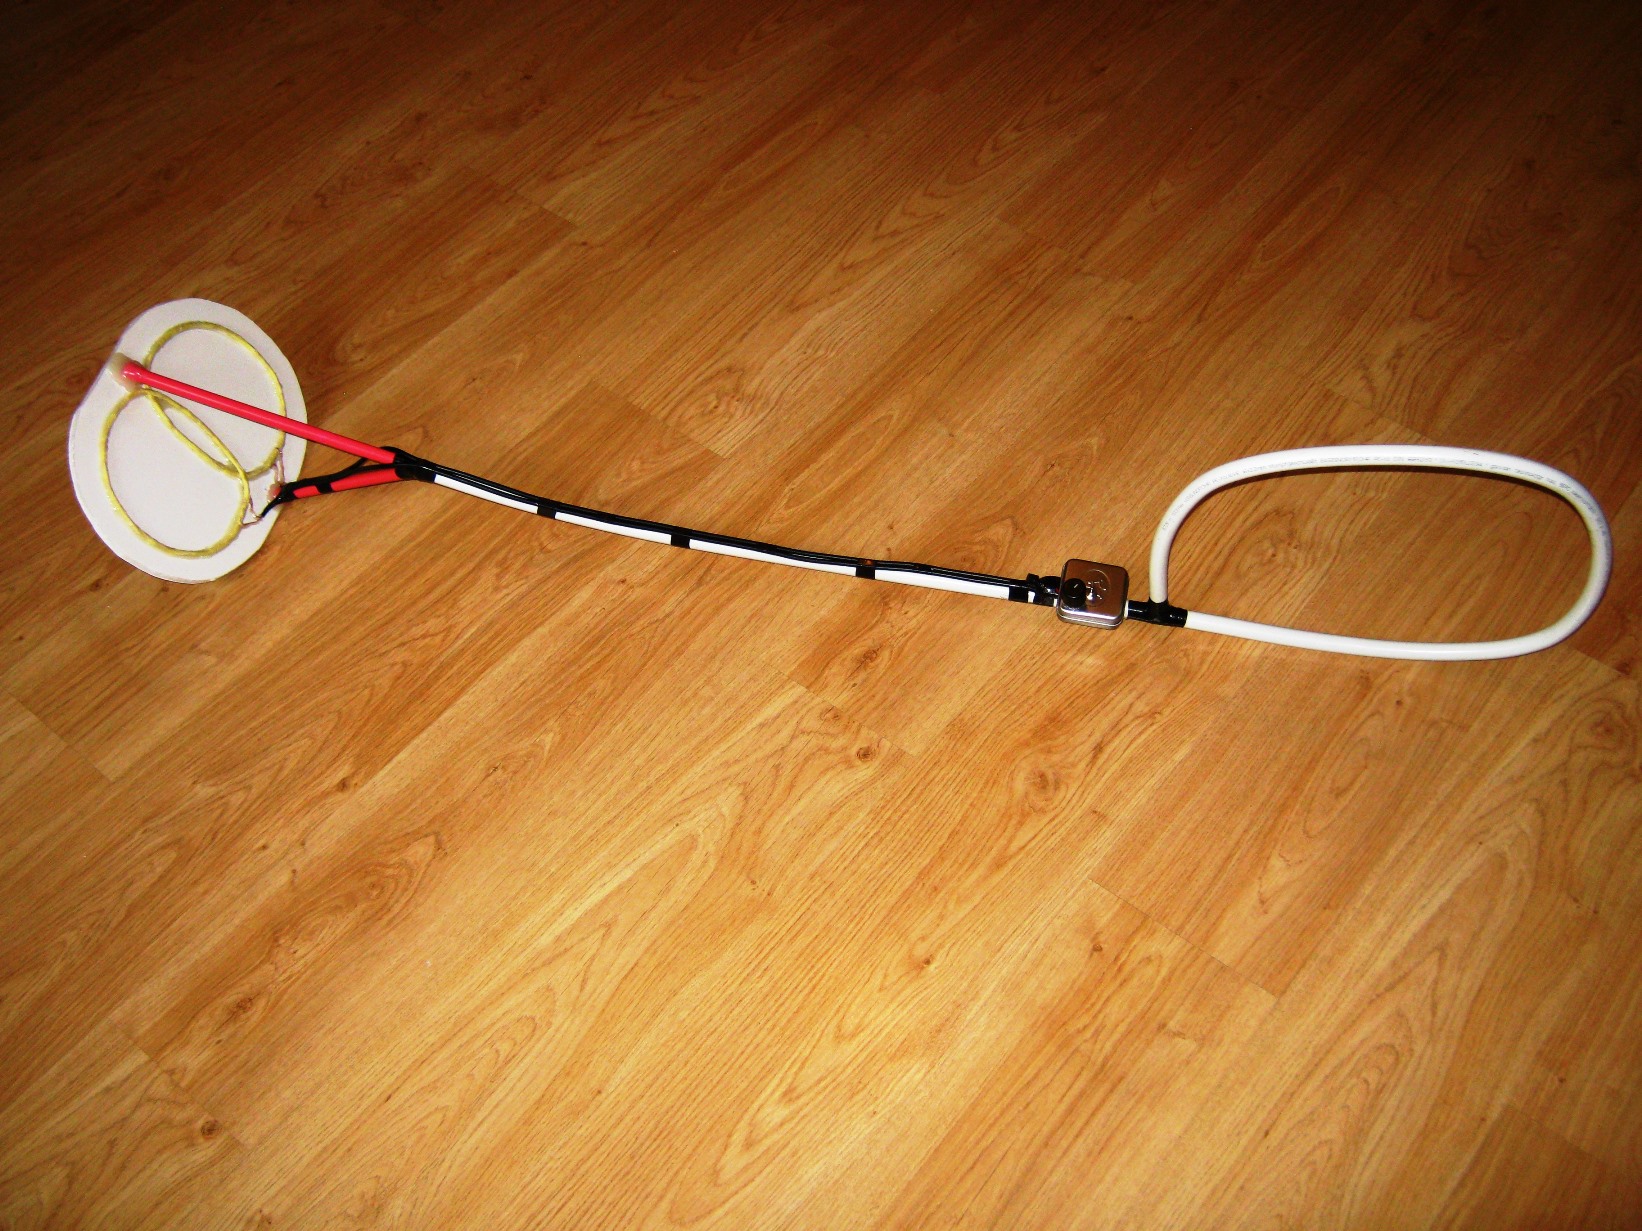
The handle was made of a metal-plastic water pipe, and closer to the base, it was continued with plastic tubes, so that the coils did not react to the handle itself made of metal. The design was rather easy. The installation of shielded wires produced electrical tape. A box with a metal detector board was mounted higher, so that the adjusting resistor was at hand.
And here's another photo:


Tip
Every time before using the detector, you should use a variable resistor to achieve a rapid cracking of the radiator. The faster the crack, the more sensitivity.

The first find
Experiment: a coin with a diameter of 2.5 cm, I buried in the ground at a depth of 25 cm. When scanning, the coils were located at a distance of 5 cm from the ground. At the same time, the metal detector produced a distinct signal. I suppose that large metal objects will "ring up" deeper.
In any case, it takes me some time to get used to the metal detector and, after some searches, to sum up the final results of his abilities.
To this article there is a video, which shows the process of creating a metal detector and its test.
DesignationProgrammable Timer and Oscillator NE555 2 Search in Fivel Bipolar transistor KT3102EM BC538, BC548B, 1 Search in Fivel Resistor 1 kΩ 1 Search in Fivel Resistor 100 kΩ 1 Search in Fivel Resistor 470 - 680 Ohm 1 Search in Fivel Resistor 2 - 2.2 MΩ 1 Search in Fivel Resistor 10 kOhm 1 Search in Fivel Trimmer Resistor 100 kΩ 1 Search in Fivel Variable resistor 100 - 500 kOhm 1 Coarse adjustment Search in Fivel Variable resistor 15 - 20 kOhm 1 Fine Tuning Search in Fivel Capacitor 0.01 uF 1 Search in Fivel Capacitor 0.0027 uF 1 Search in Fivel Electrolytic capacitor 100 uF 1 Search in Fivel Electrolytic capacitor 100 - 470 μF 1 Search in Fivel Piezo-emitter 1 Search in Fivel Switch 1 Any Search in Fivel
Leave a comment:
Leave a comment: